I would put cosplayers into two camps, those who pick characters with a different personality and those who find a similar character to themselves. I’m in the latter camp. I just can’t imagine trying to dress as a shy character. I suppose my Nurse Joy could count, but there’s like 500 Nurse Joys so I doubt they all have the same personality.
Back to the point, I picked Himiko Toga from My Hero Academia (Boku no Hero Academia) because despite being a villain, she is silly and caring and more importantly passionate. I would say those are some of the adjectives I would use to describe myself when I’m in a good mood.
So here is the full tutorial for her from top to bottom! A little disclaimer, this is not a casual project. You’ll need lots of time and energy. But the good news is, it’s not that expensive! and there are ways to cut costs from what I did so I’ll suggest those as I go as well as provide reference photos and links to the products I used. Alright, let’s start from the top then!
THE WIG
 I used the Chibi Classic in Titanium Blonde from Arda Wigs. Ash Blonde would be better for the color in the anime. I started off by untying the pigtails and soaking it in fabric softener for about two days. Arda Wigs are very high quality and don’t have much shine, but I’ve just gotten used to doing it for every wig now.

Using my new cork wig head (one of my most valuable helpers) I stuck it in two pig tails and went to town thinning it. Like seriously so much thinning the pigtails were half the size they started but they were super thick to begin with so just depends. Use got2b glued spray or any other super strong hair spray and make sure the pig tails are super coated in it. This will help it stick in the buns! Do a little twist bun and the extra crazy hairs will kinda pop out on their own but you’ll need a million bobby pins to make the base of the bun stick. I only had brown bobby pins around but it would be worth it to get blonde ones since the brown ones are so obvious if they poke out even a little.


Only trim bangs on wigs while you are wearing them. Also make sure you have your hair braided and in a wig cap as you normally would so that it doesn’t turn out weird!
A revision!! This way worked for con, but I ended up stubbing them and adding on these buns. I really wanted to not stub them so that I could possibly use this wig for Sailor Moon but I figured that it just wasn’t worth messing with bobby pins all day long at con just in case I did Usagi.
 THE TEETH
For her little vampire teeth, I used this tutorial and some fake nails I had from a previous vampire fang project. Don’t forget the denture adhesive, normal glue will taste weird, be toxic, and most likely not work.
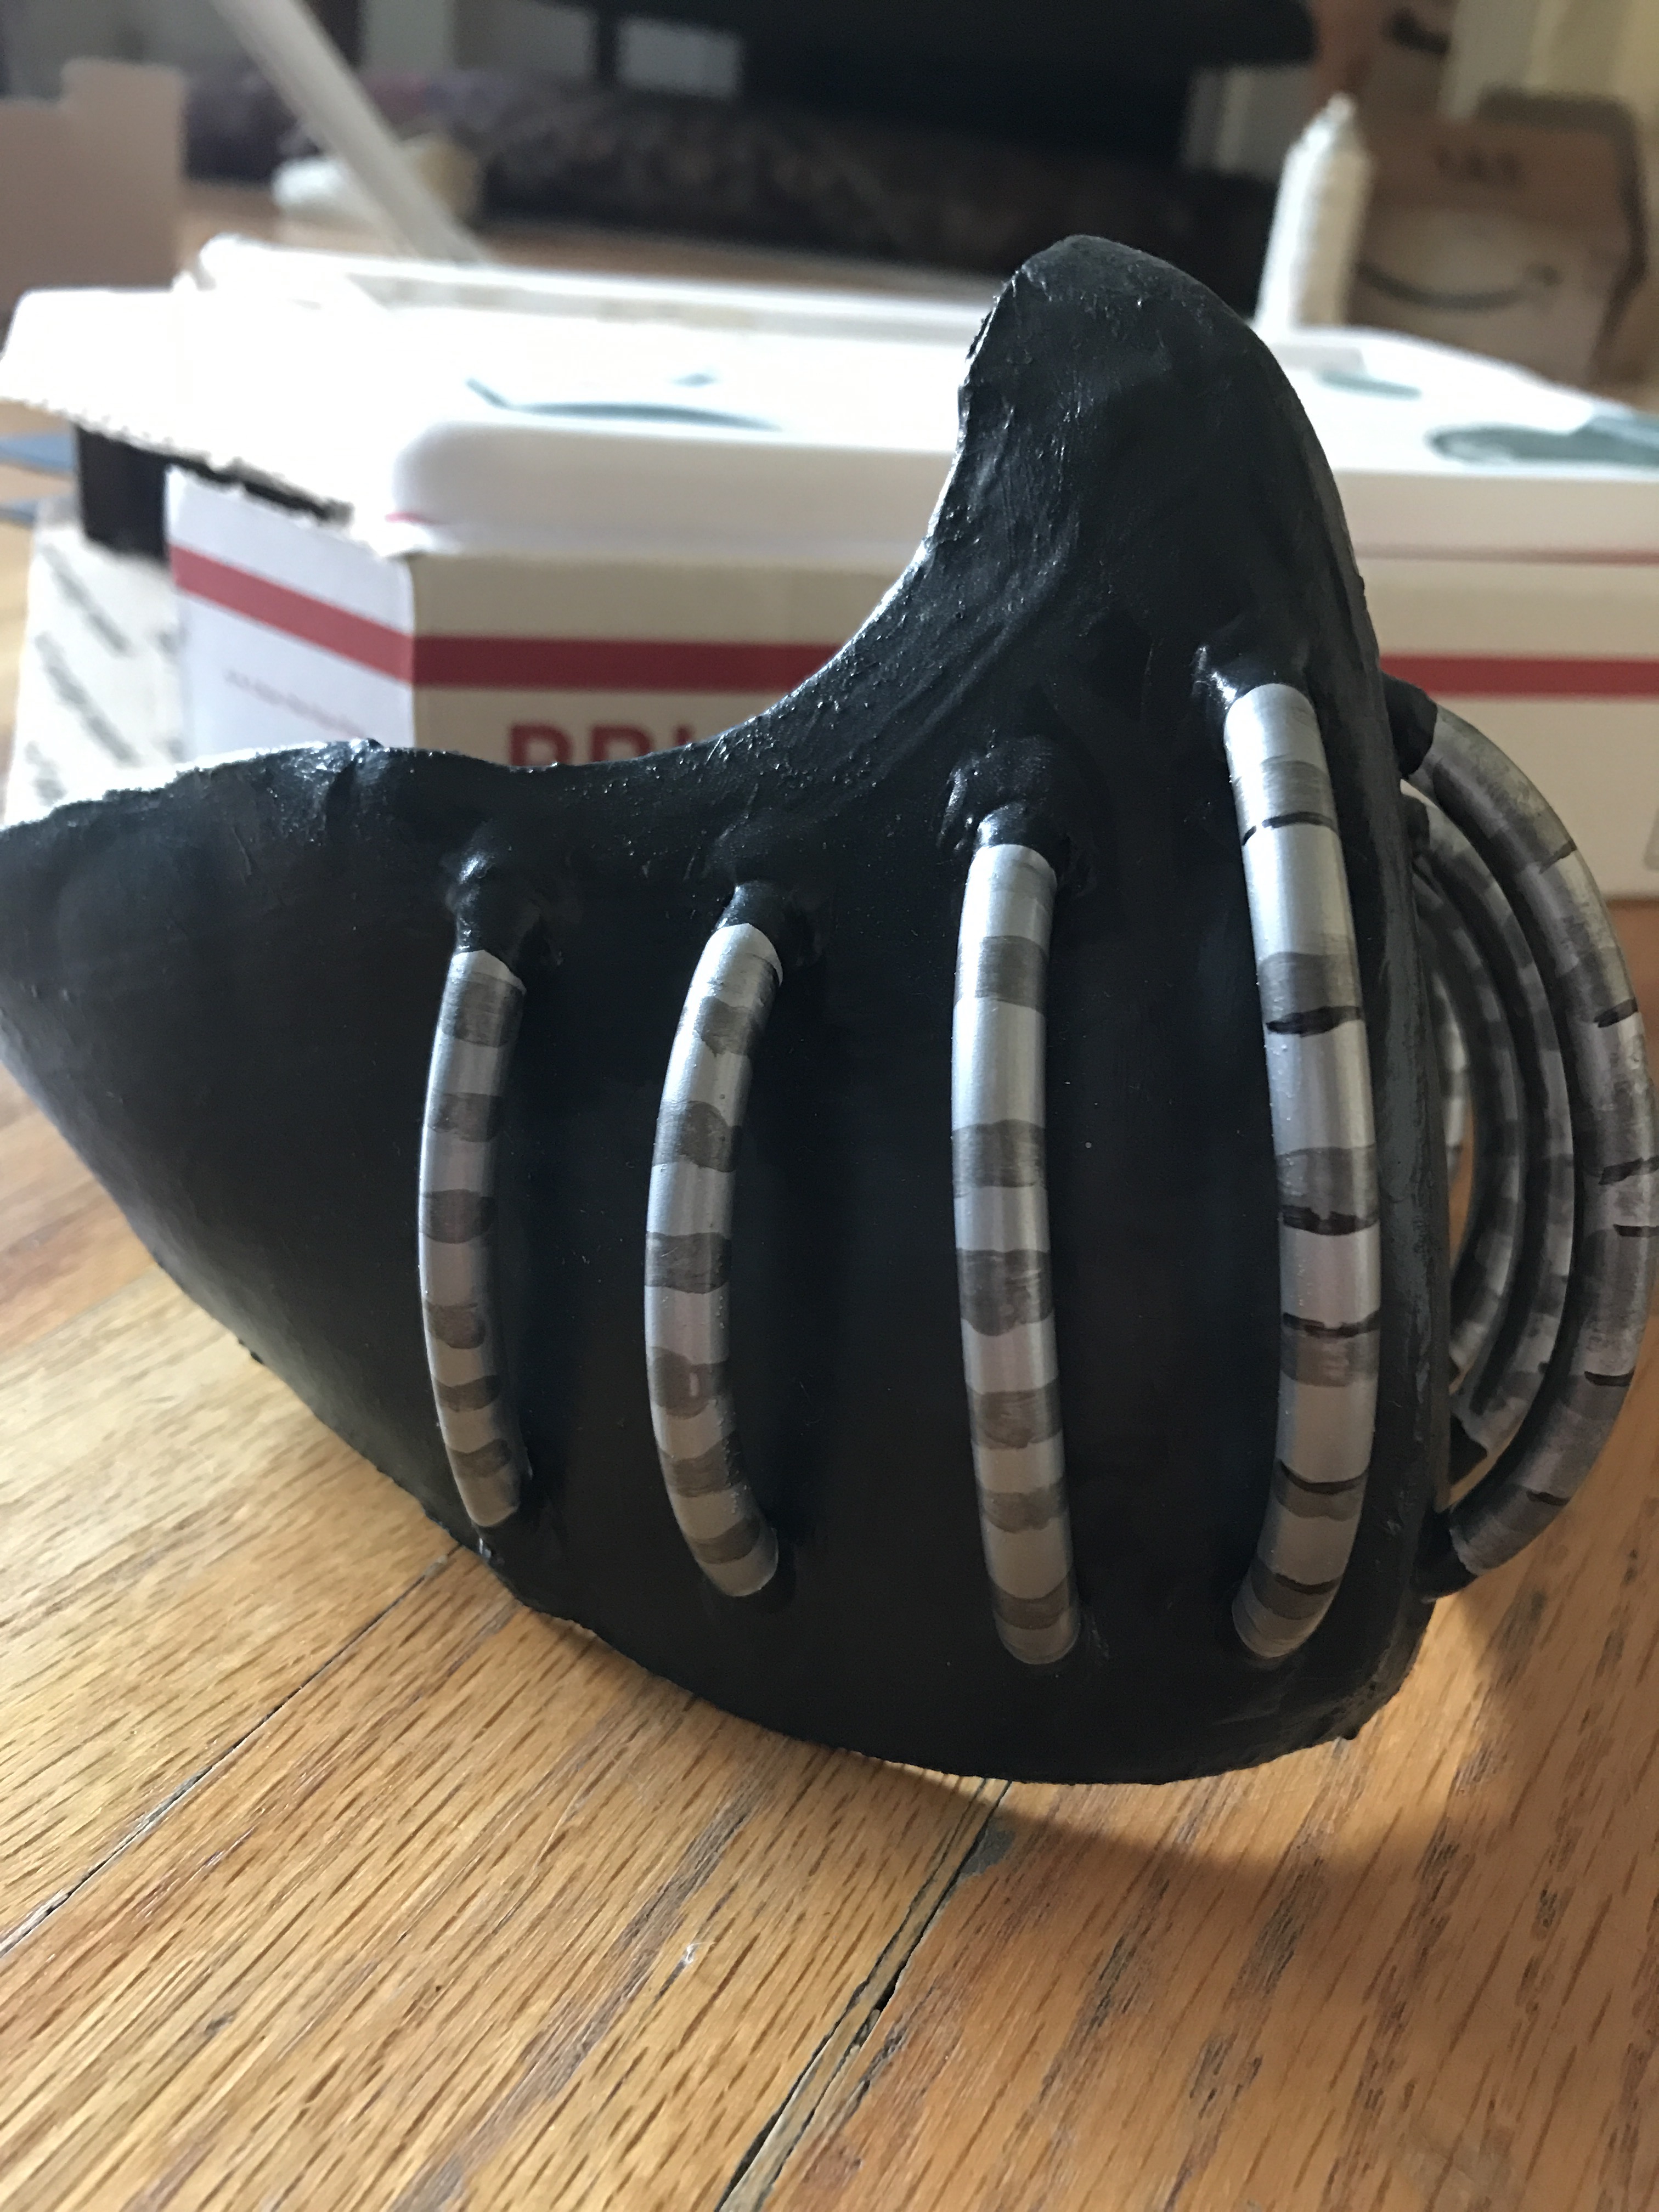
 THE GAS MASK
For her gas mask, I used Worbla, 1/4″ plastic piping, black and white spray paint, metallic silver paint, and 1/2″ black elastic. You could easily use crafting foam rather than Worbla or this aquarium plastic piping that we’ll use later.
Make a a pattern for the mask using the saran wrap and painters tape method, but try not to suffocate yourself, k?
Cut your pattern in half and choose which side looks better. Then cut onto your foam or thermo-plastic with it’s mirror image as well (plus a little extra to join them together). Be patient, this’ll take awhile but you’ll be fine.


Next what I tried to do was cover it in black fabric which was definitely my mistake because I thought somehow I could bead those little air pipes on or something? That didn’t work. So I ripped off the fabric and started painting, thinking that gluing on plastic would be easy.
Instead this is what you should do. Cover up any imperfections (like I had from messing around with it while hot for too long) by covering it in some kind of wood glue or gesso. Then I guess you could poke holes while it’s still hot in the worbla, but I would suggest using a hot knife after it’s cooled so the rest of it won’t warp. Then cut out some of your piping and squish it in. Wait till it cools, then glue it and trim the pipes THEN paint. I did this a little backwards (trial and error baby, there were no tutorials when I got started) and had to smell a lot of burning paint. Don’t do that! Learn from my mistakes, my children.


After painting and sealing, then add your elastic into whatever is most comfortable and functional for you!

HER SCARF (?)


You will need: black fleece (or another matte-ish, thick material), iron on backing (or foam), needle and black thread, thick crafting foam, worbla (optional), white acrylic paint, Tacky glue or hot glue gun, black magnets, and maybe some air dry clay and spackle.
 Let’s start with the base. I cut 20″ x 40″ of fleece, but you can just eyeball it and decide whether you need it larger or smaller than mine for your shoulders. Before realizing it wasn’t as stiff as I wanted, I had already sewn it. So learn! Put the backing on first because it was stressful putting it on then flipping it inside out and praying it wouldn’t rip.
Be careful to follow the directions on whatever kind of backing you have, it’s a little confusing if you’re new to it (like me). Alternatively, I’m sure sticking in some soft foam would work as well.
Now don’t sew it all up yet! Pin the ends together and try it on. Again, something else I did backwards. From here measure out how far you want the teeth to go across. I did not do this, and my teeth are a little bit larger than I wanted but that’s fine.
Cut out the shapes of your teeth with foam. Four large ones, eight medium ones, four small ones, and six canines. I was using thinner foam and gluing it together, so I put worbla on top to give it a smoother shape.


After I started, more chapters were released and you could see more details on the six canines. I suppose you could also make this shape with worbla or layered foam with a power sander, but like I always say: the best materials to use are the ones you have. The worbla I had stolen from my sister while I was visiting her in Berkeley so that wasn’t an option.
So using my worbla/foam pieces in the general shape I needed, I got to work. This required more patience than I’m used to with cosplay, I would much rather spend my time planning ahead rather than trying to just wing it on my own. If this is the option you choose, then just don’t forget to wet your hands while using the clay. You’ll have a much better time. Let dry, sand, apply spackle in the cracks, dry again, sand again, then prime and paint along with your other teeth.

After they’re all primed, painted, and sealed, you can use either tacky glue or a hot glue gun to stick them onto your fabric. You can see mine are a little higher than center so that the scarf would have room to fold at the bottom and not distort them too much.

So now you say ok, we’re done but why can’t I sew it up yet? and why do I need magnets? That will be seen in a later section!
SAILOR FUKU 
I’m not a good seamstress. I don’t own a sewing machine because I tried using it once and nearly tore my house apart because of how often it was misbehaving. Luckily, it’s one of the most accessible costumes of all time! Like seriously, if you’re into anime/cosplay then I’m sure you already have one on your amazon wish list.
What can’t be made will be bought and altered. I bought a navy blue sailor uniform, red handkerchief, beige/tan cardigan, and some knee high socks. I could’ve just layered this all on, but I’m not a petite girl in the first place and I’m especially cranky if I get too hot. So I altered it a little bit!

Pro tip, don’t cut it like I did. Seriously it was such a pain. I had to make my brother come in and draw a bunch of lines on it while i stood still so that it would go in place. Instead of cutting it like a bib, instead cut it like a sleeveless crop top then use pins to set it in place or ask a friend to draw the neckline around it.
The handkerchief was not as long as I would’ve liked, so I tied it in a tie, cut the top of the loop, then sewed those ends underneath to the sailor fuku top. and don’t forget to take off one of those stripes with a seam ripper! There’s three and she only has two.


THE BLOOD DRAIN MACHINE
Honestly I’m not sure if that’s the name but we’ll go with it for now. This is the most complicated part but also the cheapest! Let’s start with some references.


You will need:
- Lots of dark green paint
- Metallic silver paint
- Black paint
- Red paint (I used nail polish for extra shine)
- Six 60 ml syringes
- Hot knife (I guess you can use scissors if you’re extra determined)
- Plastic model glue or hot glue gun or another strong glue
- Silicone tubing for aquariums (I thought they were green, get some clear ones)
- Thin craft foam
- Thicker craft foam
- A belt or really thick elastic
- Two boxes (I used plastic)
- Two large bottles (cut the tops of these)
- Strong small-ish magnets
THE SYRINGES


Pull the black rubber ends off of the syringes, save those for later. Using your hot knife (or extreme determination with scissors or an exacto knife) cut off the finger hold handle things from the syringes. Sand, prime, and paint silver. This is where you would paint in the blood red little circle thing on the side of her vials, but I couldn’t see those when I started making this, so check later photos.


Cut your thin foam to cover about half of the syringes. Note that the top one has some sort of retro rocket ship vibe on it, kind of like a bell shape curve from math class. I glued it together with plastic model glue with a little help from tape but I’m sure many kinds of glue would work. A little hairdryer on high heat to make it curve a little helps too! Paint dark green, don’t forget to get the a little bit of the outside ends and the edges!


I was silly and thought they were green, then thought they were silver GUESS WHAT THEYRE CLEAR. Cut your tubing into six pieces, you can trim them down later. Then using an exacto knife (or another very, sharp object) make a hole for your tubing. Glue it on the inside so it doesn’t pop out, then stick your black rubber ends back in the syringes, and add a little glue to make sure those stick too!


Stick on your little green covers and glue those into place as well. Never too much glue, methinks. Next you’re going to cut out some of that thick black foam and glue these down together on the foam. Hot glue, plastic glue, whatever is strong because these will be sitting sideways on your scarf. Do the seam side down to make it nice n pretty. Glue those pieces onto the scarf leaving room for the top one. You could do all three, but you’ll see why I’m not doing that in a moment!

It’s hard to tell but that’s a magnet right there. I ended up using four smaller black ones rather than two of these larger silver disks because they were just too obvious. Take your magnets (make sure to test that they’re all on the correct sides so they won’t try to reject each other) and reach into your scarf, gluing them to the inside. Take the other two and glue them to the side of your retro-rocket-bell-curve top syringe.
Now you’ll have a prop that will click back into place! Go ahead and sew up your scarf now while you’re at it. Keep ahold of your piping and don’t trim it yet! You’ll need to try everything on before you do that.
THE BELT
Sand, prime, and paint your two acrylic boxes and large bottles. They’re the same dark green as the syringe covers which is why I suggested a lot of dark green paint! I ran out and mixing it to match was a real pain. Pro tip: paint the inside black and use less green paint.
Using some of your thinner foam cut out eight small squares for each box totaling at 16. You can see in the photos they’re also green with a little black line in the center of each and an outline. Glue these onto your boxes. I decided to make the center lines a little more janky to match her illustrations so far but it’s very possible that the artist could just be a little lazy. Again yay for wanting to do a character with no references!

For the bottles, you’ll need to trace the top onto some foam, cut it, then cut another small circle. Your funky little donut will host the three green tubes from each of the syringes on either side. Still don’t trim! You can always cut more but you can’t always cut less.


What are those pieces? Ah well those are attached to the belt between and on the side of the bottles. I cut and sanded these out of craft foam, sealed a million times with mod podge and painted them the same color (not pictured).
THE KNIVES


Using your thicker foam, cut twelve 1″ x 4″ pieces. Double those up with some glue and those will be your knife handles! Sand, prime, and paint your larger boxes, saving green paint by painting the insides black. Then glue those on top! Glue a little elastic around the sides. Bonus points if you use your hot knife to cut two slits in the boxes so the elastic can be looped through and sewn on the inside for extra durability. Or maybe sewn into tights… the possibilities are endless.

I had some extra time so I cut out a slit at the top of the box and a knife blade to attach to one of the handles to use as a prop! Taking a little extra time for functional props is seriously worth. Especially for those of us who don’t know what to do with our hands when a camera comes out.
SHOES
Remember how I said top to bottom? Yeah, you thought I was going to talk about butts.
I normally would’ve thrown these in somewhere here but they’re too good of shoes not to get their own special shoutout. Now these may look like your usual shoes, but what is normally leather that would cut through to your bone is a weirdly soft pleather kind of thing that makes these really pleasant to wear. Not to mention a little extra height never hurt nobody! Comfy, (almost) accurate, able to use them for a million other cosplays, and won’t break the bank. Highly suggest these shoes.
WHAT’S THE POINT IN WRITING A CONCLUSION
I gave you everything, kids. Now take it and run with it! Ask me questions, make improvements, post your own tutorials (God knows mine won’t get any traction), and give the world more psycho girl cosplays. Who doesn’t love a good yandere?


Hey awesome tutorial! I got the seifuku and mask down so far thanks to you. i have a question though, what size bottle and what size plastic boxes did you use according to the site? (like ex. FT-38 or the bottle size 32 oz jug)
LikeLike
Sorry for my super late response! I hope you were able to find one that worked, unfortunately I can’t remember :/
LikeLike
Oh my goodness, thank you so much for this amazingly detailed tutorial!! I was just brainstorming and budgeting ways to make Toga’s gear, and this post was super helpful! Your cosplay turned out great! :)
LikeLike
Thank you so much! I’m going to sell it soon but first I will get better pictures to show it off!
LikeLike
thanks for the great ideas! i’m making mine soon and every new tutorial i watch/read gives me more awesome ideas :)
LikeLike
Yes! I always read every tutorial how big or small because it always will give you a new idea or explain something in a new way. That way you can make your cosplay for your ability and budget!
LikeLike
This is probably the best tutorial I have ever seen! Now I know how to make my toga cosplay! Thank you for your amazing tutorial!
LikeLike
Thank you so much!! This comment made me so proud <3
LikeLike
Yo, really neat tutorial! I’m a bit confused on the scarf, since you said not to sew it up when putting the teeth on. Do you just like, fold it over as you put the teeth on? Or do you just like, sew it all up except for one side? Sorry for being dumb
LikeLike
Not dumb at all! Sorry for the slow response. Mostly it’ll just make it easier to glue everything on if you wait to sew it together at the end
LikeLike
Wow! This looks super interesting! I’m gonna do this for Halloween I guess, TYSM
LikeLike
Of course! I’m excited to see how yours turns out!
LikeLike
did you use clay for all the teeth or just the canines
LikeLike
I only used clay on the canines!
LikeLike